Model Train Forum banner

HO Track Plans published by Atlas vs. SCARM vs. Atlas Track Planning Software

13K views 37 replies 12 participants last post by  Conductorkev  
#1 ·
Has anyone built a track plan published by Atlas in one of their books like “Atlas HO Layouts for Every Space”? Did it fit together perfectly (or almost perfectly) using the products Atlas called out in their “ATLAS Track Products Required" list?

I ask because I’ve been trying to plan a published layout that I liked that did not have product list. I found sections hard to connect without using flex track. I also found it had grades from 3.1% to 4.3% so I stopped working on it.

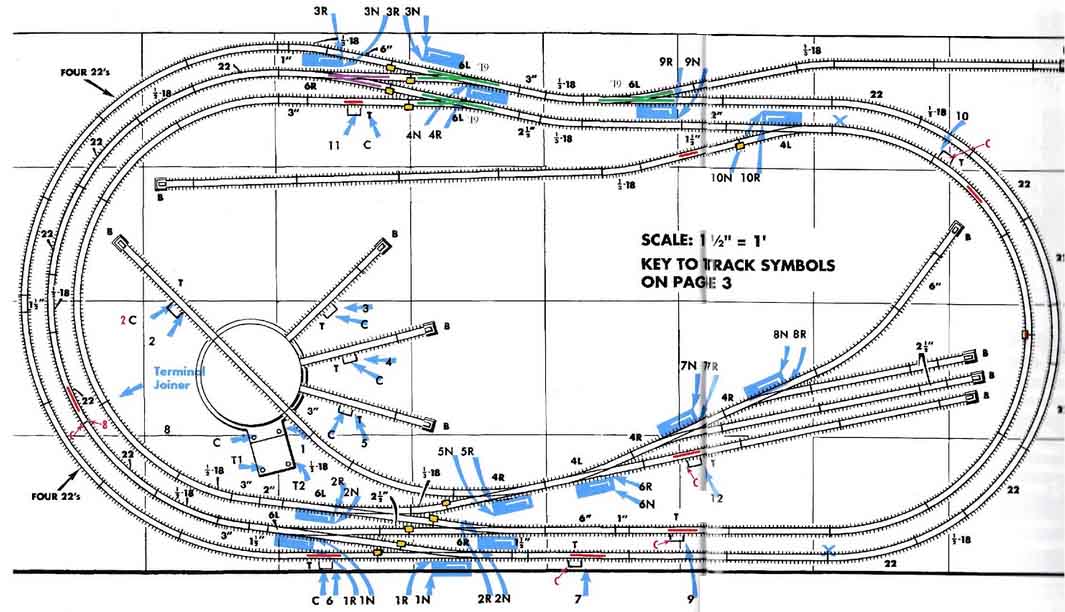
I fell back to layout HO-15 in “Atlas HO Layouts for Every Space , Updated for 2021 ” and put it into SCARM using the Atlas product list from SCARM. I found there are sections that don’t connect in SCARM . See the yellow highlighted section below. I did the same thing with Atlas Track Planning Software, which appears to be a clone of SCARM, and found the same problem.

  • Has anyone built a track plan published by Atlas without a problem?
  • Are there bugs in SCARM/ATPS?
  • Some combination of the above?
I would think that as old as the published Atlas track plans are that the bugs/typos have been corrected.

Atlas track plan HO-15 in their “Atlas HO Layouts for Every Space , Updated for 2021”:
Image


HO-15 entered in SCARM:
Image


HO-15 entered into Atlas Track Planning Software:
Image
 
#37 · (Edited)
The issue primarily was intermittent contact of the switch blade to the main line rail (either side). it was so sensitive to dust or crud getting into the gap. I have the layout in an air conditioned room in the house, so dust should not be the issue. Even with a servo pulling or pushing the rails together with a spring arm, it may not connect reliably. I tried PECO electrofrog, insulfrog and unifrog versions, no differences (with appropriate wiring changes). I did remove the spring in the mechanism so I could use a servo. The servo has about 8:1 leverage at the closure point pivot. Finally, I gave up, and hard wired the blades to the respective hot rails, and added insulators in both of the center exit rails. This fixed the problem. It took a few experiments to figure out what the actual failure mechanisms were. I have used Atlas components in many variations since we started with my dad in the early 1960's, and stuck with what works for me. As you noted with PECO you have good luck with them. I have had good luck with Atlas. The only bummer is that they do not make a curved switch in Code 80 n scale....
 
#38 ·
The issue primarily was intermittent contact of the switch blade to the main line rail (either side). it was so sensitive to dust getting into the gap. I have the layout in an air conditioned room in the house, so dust is not the issue. Even with a servo pulling or pushing the rails together with a spring arm, it may not connect reliably. I tried PECO electrofrog, insulfrog and unifrog versions, no differences (with appropriate wiring changes). I did remove the spring in the mechanism so I could use a servo. It has about 8:1 leverage at the closure point. Finally, I gave up, and hard wired the blades to the respective hot rails, and added insulators in both of the center exit rails. This fixed the problem. It took a few experiments to figure out what the actual failure mechanisms were. I have used Atlas components in many variations since we started with my dad in the early 1960's, and stuck with what works for me. As you noted with PECO you have good luck with them. I have had good luck with Atlas. The only bummer is that they do not make a curved switch in Code 80 n scale....

The way you talked about peco switches is everything that happens to the snap line of Atlas the mainline atlas I've only have used a cpl and had no probs.
The main problem with the snaps is the diverging route has a small tight curve along with not having any slice for the points.


Not sure how you had so many issues the only grip I hae with their switches motors is that those tabs on the underneath motors tend to come loose easy
 
#34 · (Edited)
On the Atlas track plans- we built the Granite Gorge plan first in about 1960-61 (my dad did the building). Then, we rebuilt it in the early 1970's. I adapted pieces of the plan into my own designs in HO scale. later on (3 different layouts) The plans always worked per the drawings, using Atlas track. The only thing we did was to make the base table about 1 foot larger than the plan to have a bit more room around the edges, and to handle crashes from small children... More recently, I built the GG&N again in n scale (no basement...) with an additional perimeter loop with a two-track station. I built the core area with Atlas parts, with no problems using Woodland Scenics ramps instead of cutting the base panel. SOOO much easier! I grudgingly had to use three PECO curved switches, which was a very costly effort to get them to actually function. I know this is different from many opinions, but I tossed 5 PECO switches in the bin because they did not work after a few days or weeks on the layout. Mostly it was continuity issues from their power routing methods, even using servos to overdrive the switch rails to ensure contact. But I finally figured out a wiring method to get around their design issues. I am designing a large n scale layout in anticipation of a new home with a 2000 sq ft basement!! Just bought AnyRail, and starting to use it. First comments- it is ok, but not great for a large layout. Too much moving and rescaling needed to lay the tracks. BTW- I have used CAD programs ever since AutoCad was released, so this is not a learning curve problem.
One thing I have learned over the past almost 60 years is to use flex track everywhere. So much easier than the sectional track.
This is the original Granite Gorge and Northern layout from Armstrong (Atlas) in HO.
Image


Here is my N scale version, with additions. The circles are switch numbers, the green dots are insulators. The layout is DCC. Switches are controlled through Arduinos (UNOs and MEGAs) and 5V relay sets. Three switches are curved (PECO), driven by servos from another Arduino UNO. Indicators for switch position are powered from the Arduinos. The track power is provided at many locations from the NCE Power Cab distribution blocks.
Image
 
#36 ·
On the Atlas track plans- we built the Granite Gorge plan first in about 1960-61 (my dad did the building). Then, we rebuilt it in the early 1970's. I adapted pieces of the plan into my own designs in HO scale. later on (3 layouts) The plans always worked per the drawings, using Atlas track. The only thing we did was to make the base table about 1 foot larger than the plan to have a bit more room around the edges, and to handle crashes from small children... More recently, I built the GG&N again in n scale (no basement...) with an additional perimeter loop with a two-track station. I built the core area with Atlas parts, with no problems suing Woodland Scenics ramps instead of cutting the base panel. SOOO much easier! I grudgingly had to use three PECO curved switches, which was a very costly effort to get them to actually function. I know this is different from many opinions, but I tossed 5 PECO switches in the bin because they did not work after a few days or weeks on the layout. Mostly it was continuity issues from their power routing methods, even using servos to overdrive the switch rails to ensure contact. But I finally figured out a wiring method to get around their design issues. I am designing a large n scale layout in anticipation of a new home with a 2000 sq ft basement!! Just bought AnyRail, and starting to use it. First comments- it is ok, but not great for a large layout. Too much moving and rescaling needed to lay the tracks. BTW- I have used CAD programs ever since AutoCad was released, so this is not a learning curve problem.
One thing I have learned over the past almost 60 years is to use flex track everywhere. So much easier than the sectional track.
This is the original Granite Gorge and Northern layout from Armstrong (Atlas) in HO.
View attachment 644407

Here is my N scale, with additions. The circles are switch numbers, the green dots are insulators. The layout is DCC.
View attachment 644408


Hmm I have something like 25 peco turnouts. Sone use the underneath switch a cpl use the side mount but most are modified to use tortoise switches. I have never had any problems with them that wasn't my fault.
 
#31 ·
Improving Atlas Turnouts! That is one of your (highly valuable) documents I've begun to highlight.

HO-36 is not intended to be a prototypical railroad. It is a toy I've desired since my earliest memories. My uncle owned a hobby store a few blocks away from my grandparent's house and before I could read I was perusing Atlas books.

I remember seeing HO-36 as a little boy. My father and his younger brother (my favorite uncle) eventually built an L-shaped layout in the basement. Even in the mid-1970s the problem with Atlas solenoid switch machines melting was well understood. My father and uncle purchased momentary switches to avoid the problem. Despite their efforts my sister and I managed to melt most of them by hitting the momentary switches as fast as possible until they melted.

Eventually there was a flood and the layout floated around the basement. That was the end of model railroading at my house.

Despite the overall absence of prototypical features, I'll keep HO-36 as faithful as possible to the Perkiomen Branch of the Reading Line. I've been driving around and identifying the remains of the Perkiomen Branch - much of which is now a pedestrian path. Two structures I would very much like to create are the Spring Mount Hotel (a few feet away from the Perkiomen Line) and the truss bridge just north of the Spring Mount Hotel. The truss bridge is a sturdy creature - my son and his friends jumped of it years ago when they were teenagers. It still stands and people walk over it every day.

I have a complete list of all of the locomotives used by the Reading Lines - with details. Some of my father's earliest memories are sounds of a tiny Reading 0-4-0 camelback working the yard in Lansdale, so a Reading 0-4-0 with DCC, sound, and smoke will be my first purchase.

This will probably be a year or so from now - I continue to welcome and appreciate your insight!
 
#29 ·
I understand your concerns and agree!

The HO-36 layout set is available from other vendors for under $2000.

I've seen your concerns with Atlas turnouts reflected in multiple posts from experienced modelers. Other manufacturer's turnouts are better quality.

However, multiple experienced modelers have posted that most (if not all) turnouts require tuning before installation. Multiple experienced modelers have posted that they use Atlas Code 100 turnouts and with proper tuning they function properly.

HO-36 is not a prototypical layout. Especially with Atlas switch machines and Snap Relays on top of the layout. My goal is to create a layout I've been looking at since I was a little kid.

I grew up between two branches of the Reading Lines. The line that ran to Bethlehem and the line that ran to Allentown. I drove across the Reading Line in Souderton on a daily basis on the school bus to high school. The Reading Line track was still intact from Perkiomen to Allentown when I was young. When I took the SEPTA train to Philadelphia it ran on the old Reading Line. I own a home literally 0.1 miles from the original Reading Line right-of-way and the neighborhood pizza shop sits 100 feet away from the pedestrian path on the old Reading Lines right-of-way.

I'm going to do my best to recreate the Perkiomen Line. I've been driving around and looking at the existing Reading Line track (now SEPTA), taking notes, and determining what structures I can recreate. So HO-36 will be somewhat prototypical.

I downloaded all of your files and began highlighting several. I appreciate your insight!
 
#35 ·
Hi I saw your post- We lived in Wyomissing when I worked at Bell. I went to the Allentown Bell facility often for meetings. I know roughly where those tracks were! On the Atlas switch thing- I honestly do not know what the problem is... I have used Atlas stuff since my dad helped us build the first layouts in the early 1960s. The only weakness that I recall is the drive motors burning out now and then when the switch button was held down too long (mostly a younger brother or sister issue, which they out-grew). We changed to momentary switches, and later to switches and relays, now I use Arduinos and 5V relays.
 
#27 ·
Here's my best attempt! (attached). Unfortunately, its a JPG. ModelTrain Forum has (in their wisdom) forbidden users from uploading a SCARM file.

Since I just started using SCARM last week I feel a certain sense of accomplishment.

However, it would be impossible to build a layout based on the attached SCARM layout plan. It does not correspond to objective reality and uses flextrack throughout the layout. Wherever I couldn't work things out I simply slapped some flextrack in.

This layout plan is unusable and I wouldn't upload it to the SCARM layout library.

I am very much hoping that Atlas is interested in providing their customers an accurate SCARM layout. I am not able to recreate HO-36 from the original drawing in Atlas King-Size Plan Book.
 

Attachments

#26 ·
The extra short piece would be on the outer loop, not the inner, if both curves are the same radius. The outer curve would be widened with the extra piece at the center of the curve.

I don't see it in the track plan, but I can't read any of the dimensions with that size photo.

If you look at the Great Eastern Trunk, you can see the additional short piece of track on the left outer curve. In addition, they have used a mix of factional 18" radii pieces and 22" pieces on the middle track.

Image
 
#25 ·
Thanks for that tip! I'll give it a try - but I'm struggling to recreate Atlas HO-36 Oregon Pass Lines in SCARM.

There are no 2" or 2.5" sections in the inner loop.

I'll try your tip - but it seems to me that if the outer loop is 22" - the inner loop must be a smaller radius. However, that radius is not specified.

There are several other areas of HO-36 that either do not correspond to the current Atlas Code 100 track library or cannot be recreated from the origional drawing (attached).

I'm hoping Atlas will create a new version of HO-36 using the current SCARM Atlas Code 100 library. Atlas customers would be able to begin HO-36 with an accurate track layout. Atlas charges $2500 for the layout package, so it seems an accurate track layout would benefit Atlas.
 

Attachments

#28 ·
Thanks for that tip! I'll give it a try - but I'm struggling to recreate Atlas HO-36 Oregon Pass Lines in SCARM.

There are no 2" or 2.5" sections in the inner loop.

I'll try your tip - but it seems to me that if the outer loop is 22" - the inner loop must be a smaller radius. However, that radius is not specified.

There are several other areas of HO-36 that either do not correspond to the current Atlas Code 100 track library or cannot be recreated from the origional drawing (attached).

I'm hoping Atlas will create a new version of HO-36 using the current SCARM Atlas Code 100 library. Atlas customers would be able to begin HO-36 with an accurate track layout. Atlas charges $2500 for the layout package, so it seems an accurate track layout would benefit Atlas.
Timken1111;

That $2500 price for track seems a bit steep. Especially as it includes a lot of Atlas turnouts, which, if they are the cheaper "Snap Switches", are some of the worst available. Built with dozens of Snap Switches, this layout would be a derailment prone maintenance nightmare. If they are Atlas "Custom Line" turnouts, those would be better, but still not as good as Peco, Micro Engineering, or Walthers.

Traction Fan
 
#24 ·
There may be a small 2" or 2-1/2" section of straight track at the halfway point through the outer curve to keep them both at 22" radii. The Atlas Great Eastern Trunk I built in '83 used this trick to keep both curves using the same radius track.

Using the Atlas book and the bill of materials, my track went together flawlessly. It was a great running railroad even as small as it was.
 
#23 ·
I'm recreating Atlas HO-36 Oregon Pass Lines in SCARM and I'm having exactly the same problems outlined in this original post. I'm using the original hand-drawn HO-36 Oregon Pass Lines from the Atlas HO King-Size Plan Book as a reference. However, the hand-drawn original is probably over 50 years old.

The hand-drawn Atlas parts don't always align with currently available parts in the SCARM Atlas library. As noted in this thread - the workaround is to cheat with flextrack. Flextrack works 90% of the time - but in a few places it's not possible to join the track sections with flextrack.

One of the most perplexing issues with HO-36 is that it is drawn with sections of congruent curved sections that are both defined as 22". That's obviously not possible - if the outer loop is 22" the inner congruent loop would have to be be a smaller radius. Presumably that would be 18" - but there's no way to tell what the actual radius is. The work-around is to lay out the outer loop with 22" sections and eyeball the inner loop with flextrack. That's a temporary solution though - eventually the radius of the inner loop will need to be defined.

Once I get HO-36 completed I'm going to send it to Atlas with these notes and ask if they could create an accurate HO-36 in SCARM. Presumably Atlas would want an accurate HO-36 posted on their website and uploaded to SCARM as well since the Atlas track package is $2500.

If anyone on Model Railroad Forum is interested in creating HO-36 in SCARM that would be great! It's an intelligence test. Not easy to figure out!
 
#17 ·
What, exactly, looks "off" about it?
As always you make excellent points, my issue will be the incline from that reverser by my station, different height with such short distance and the offset angles of the 3 tracks going from middle right to the top left. There will be a river going between those sets of tracks. I also want another crossover somehow (maybe can’t) but not on my straight bridge. I might still have to take that autoreverser track out still, just not sure yet.


The only change I would consider is installation of a #8 or #10 turnout on the right side of the wye that leads to the yard on the left side of the layout. Right where the red X is on your trackplan near the end of the access opening. I would move it back nearer to the dual track crossing. This would make for a smoother transition to that yard lead/third outside loop.
Great idea as well Michael and I don’t know if I will even keep that turnout there due to the height and tightness, that is the start of my bridge in that area and a slope. I might just keep a straight piece in the turnouts spot with a small straight that I can get an engine on to reverse.
 
#18 ·
As always you make excellent points, my issue will be the incline from that reverser by my station, different height with such short distance and the offset angles of the 3 tracks going from middle right to the top left. There will be a river going between those sets of tracks. I also want another crossover somehow (maybe can’t) but not on my straight bridge. I might still have to take that autoreverser track out still, just not sure yet.


Great idea as well Michael and I don’t know if I will even keep that turnout there due to the height and tightness, that is the start of my bridge in that area and a slope. I might just keep a straight piece in the turnouts spot with a small straight that I can get an engine on to reverse.
Can you mark the desired elevated sections of track in Anyrail and post the drawing? I'm having trouble visualizing it from your description. in Anyrail, just create a track segment and change the color. Anyrail will calculate grades for you based on the heights you set, but that's a more advanced topic.
 
  • Like
Reactions: BigGRacing
#16 ·
What, exactly, looks "off" about it? See that's the thing -- everyone's tastes and preferences are different, so what looks "off" to you may be just fine for everyone else. There are only two immediate issues I see: in the lower right, the 3rd track from the right, needs a tail to be useful; and the track right above the wharf is marked in red, which means that it is sharper than the designated minimum curve.

I don't remember what turnouts were used in the design; a simple answer to Peco turnouts is to just replace them all in the Anyrail file, then tweak the track as necessary to accommodate them.

But if you can tell us what, exactly you want to change, we can help.
 
  • Like
Reactions: Colbert
#15 ·
The only change I would consider is installation of a #8 or #10 turnout on the right side of the wye that leads to the yard on the left side of the layout. Right where the red X is on your trackplan near the end of the access opening. I would move it back nearer to the dual track crossing. This would make for a smoother transition to that yard lead/third outside loop.
 
#12 ·
This is a known problem with a SCARM Atlas library. There are two track libraries with different geometries for the switches. #4 turnouts are 12 degrees and 50 seconds, not 12.5 degrees. (12.83333 degrees) -- I think there were issues with #6 as well. SCARM identified this and fixed it -- but I think you have to do something manually (unzipping a new library or something) to implement the change.

Regardless, they always don't fit perfectly whenever Custom Atlas turnouts are used into curved sections that are part of an oval. In my opinion, they should have used the Snap switches which are made to replace an R18 or R22 curves -- especially in these basic plans.
 
#7 ·
I enjoy re-creating the Atlas track plans in AnyRail. Very few go together exactly as published -- only the most simple. The same goes with Lionel FasTrack plans. If the original plan has grades, this complicates the reliability of the 2D representation of the plan... especially if the grades are steep and unrealistic.

Flex track is very nice, but it can't fix bad geometry. I typically plan without using flex as much as possible. When I do use it, the software will warn me if I generate a tight radii.
 
#6 ·
Vantage;
I suspect just about all of us started out with an Atlas track plan way back when we were newbies. In my case, and probably many of the other "old fossils" on this forum, that was "BC" (Before Computers)
I just plugged the track pieces together and it fit. However, I did have a component list, and the track pieces were called out on the diagram. Notice the 18", 9", etc. markings next to the track pieces in the first Atlas diagram.
Why it doesn't line up in SCARM I don't know my idea of a "track planning software tool" Is a soft #2 pencil. The Atlas track plans, in print, or online, are basically advertisements for selling Atlas's sectional "Snap Track" and "Snap Switches." They were never designed to be built with any other type of track, or turnouts.

You will be far better off using flex track, and Peco turnouts, than sectional track, and Atlas's poor quality, derailment prone, "Snap Switch" turnouts. You can follow the general shape & track arrangement of a published plan if you like.
If you do, you will end up with something where the trains go round & round, and not something that looks, or operates, anything like a real railroad does. That's quite OK though, as long as that's what you really want.
The other option is lots of research on a real railroad, and picking out a small, & relatively simple, part of their trackage that you can approximate in model form. Most of us start out with the former, and end up with the latter, many educational years later.

Good Luck & Have Fun;

Traction Fan 🙂
 
#3 ·
The particular plan you selected as your example, (Twice Around in a 4'x7'), happened to be one I attempted, about 36 years ago, when I first moved in my home. No it didn't work out quite like the plan in the book. I chose to build it on a 5'x9'table, and elevate portions to allow for a elevated crossing rather than at grade. I also had a connected inner loop and some sidings. Yes the grade was ridiculously steep, and the inner loop had issues, being it had 18" radius curves, that my BB SD40-2 didn't like. But it worked, and gave me and the kids many hours of fun, before I moved on to larger layouts.

Cannot comment on the Computer track planners, never used one.